How to Translate a YouTube Video to English: 3 Methods in 2026
You hit a YouTube video in Spanish, Japanese, or Mandarin — and you want it in English. Maybe it's a tutorial you actually need, a course lecture, a viral clip your friend shared, or your own video that you want to publish for a wider audience. In 2026, you have three real options, and the right one depends on whether you're watching, learning, or publishing. This guide walks through all three — auto-subtitles, full dub with voice cloning, and bilingual subtitles — with the trade-offs that actually matter.
Three Ways to Translate a YouTube Video
There's no single "YouTube translator" because there are three different problems hiding under one phrase. (1) You want to watch a video in your language — solved by subtitles, often the fastest path. (2) You want a publishable version in another language — solved by full dubbing with voice cloning, slower but more shareable. (3) You want to learn the source language while watching — solved by bilingual subtitles, the language-learning sweet spot.
This guide covers all three. Each method has a free or near-free option for casual use and a paid option that handles the polish you'd want for production. Pick by use case, not by which one is "best" — they solve different problems.
Why a Single Method Won't Work for Everything
YouTube's built-in auto-translate is convenient but rough — it handles common dialogue okay and falls apart on idioms, slang, accents, technical jargon, and any place where context matters. For a 5-minute clip that's fine; for a 90-minute course lecture, the cumulative drift renders it unwatchable.
Dubbing is the opposite trade: slower to produce but easier to watch. If you're publishing to an audience that won't read subtitles (kids, older viewers, anyone watching while doing something else), dubbing is non-negotiable.
Bilingual subtitles are the language-learner's secret weapon — show both languages stacked together so you read the translation while hearing the original. This is the only method that actually *teaches* you the source language while you watch.
The three methods below are not ranked. They each solve a specific problem better than the other two.
Three Methods, Side by Side
Method 1: Auto-Subtitles + Browser Translation (Free, Fastest)
Best for: quickly watching a single video in another language. Time investment: 30 seconds.
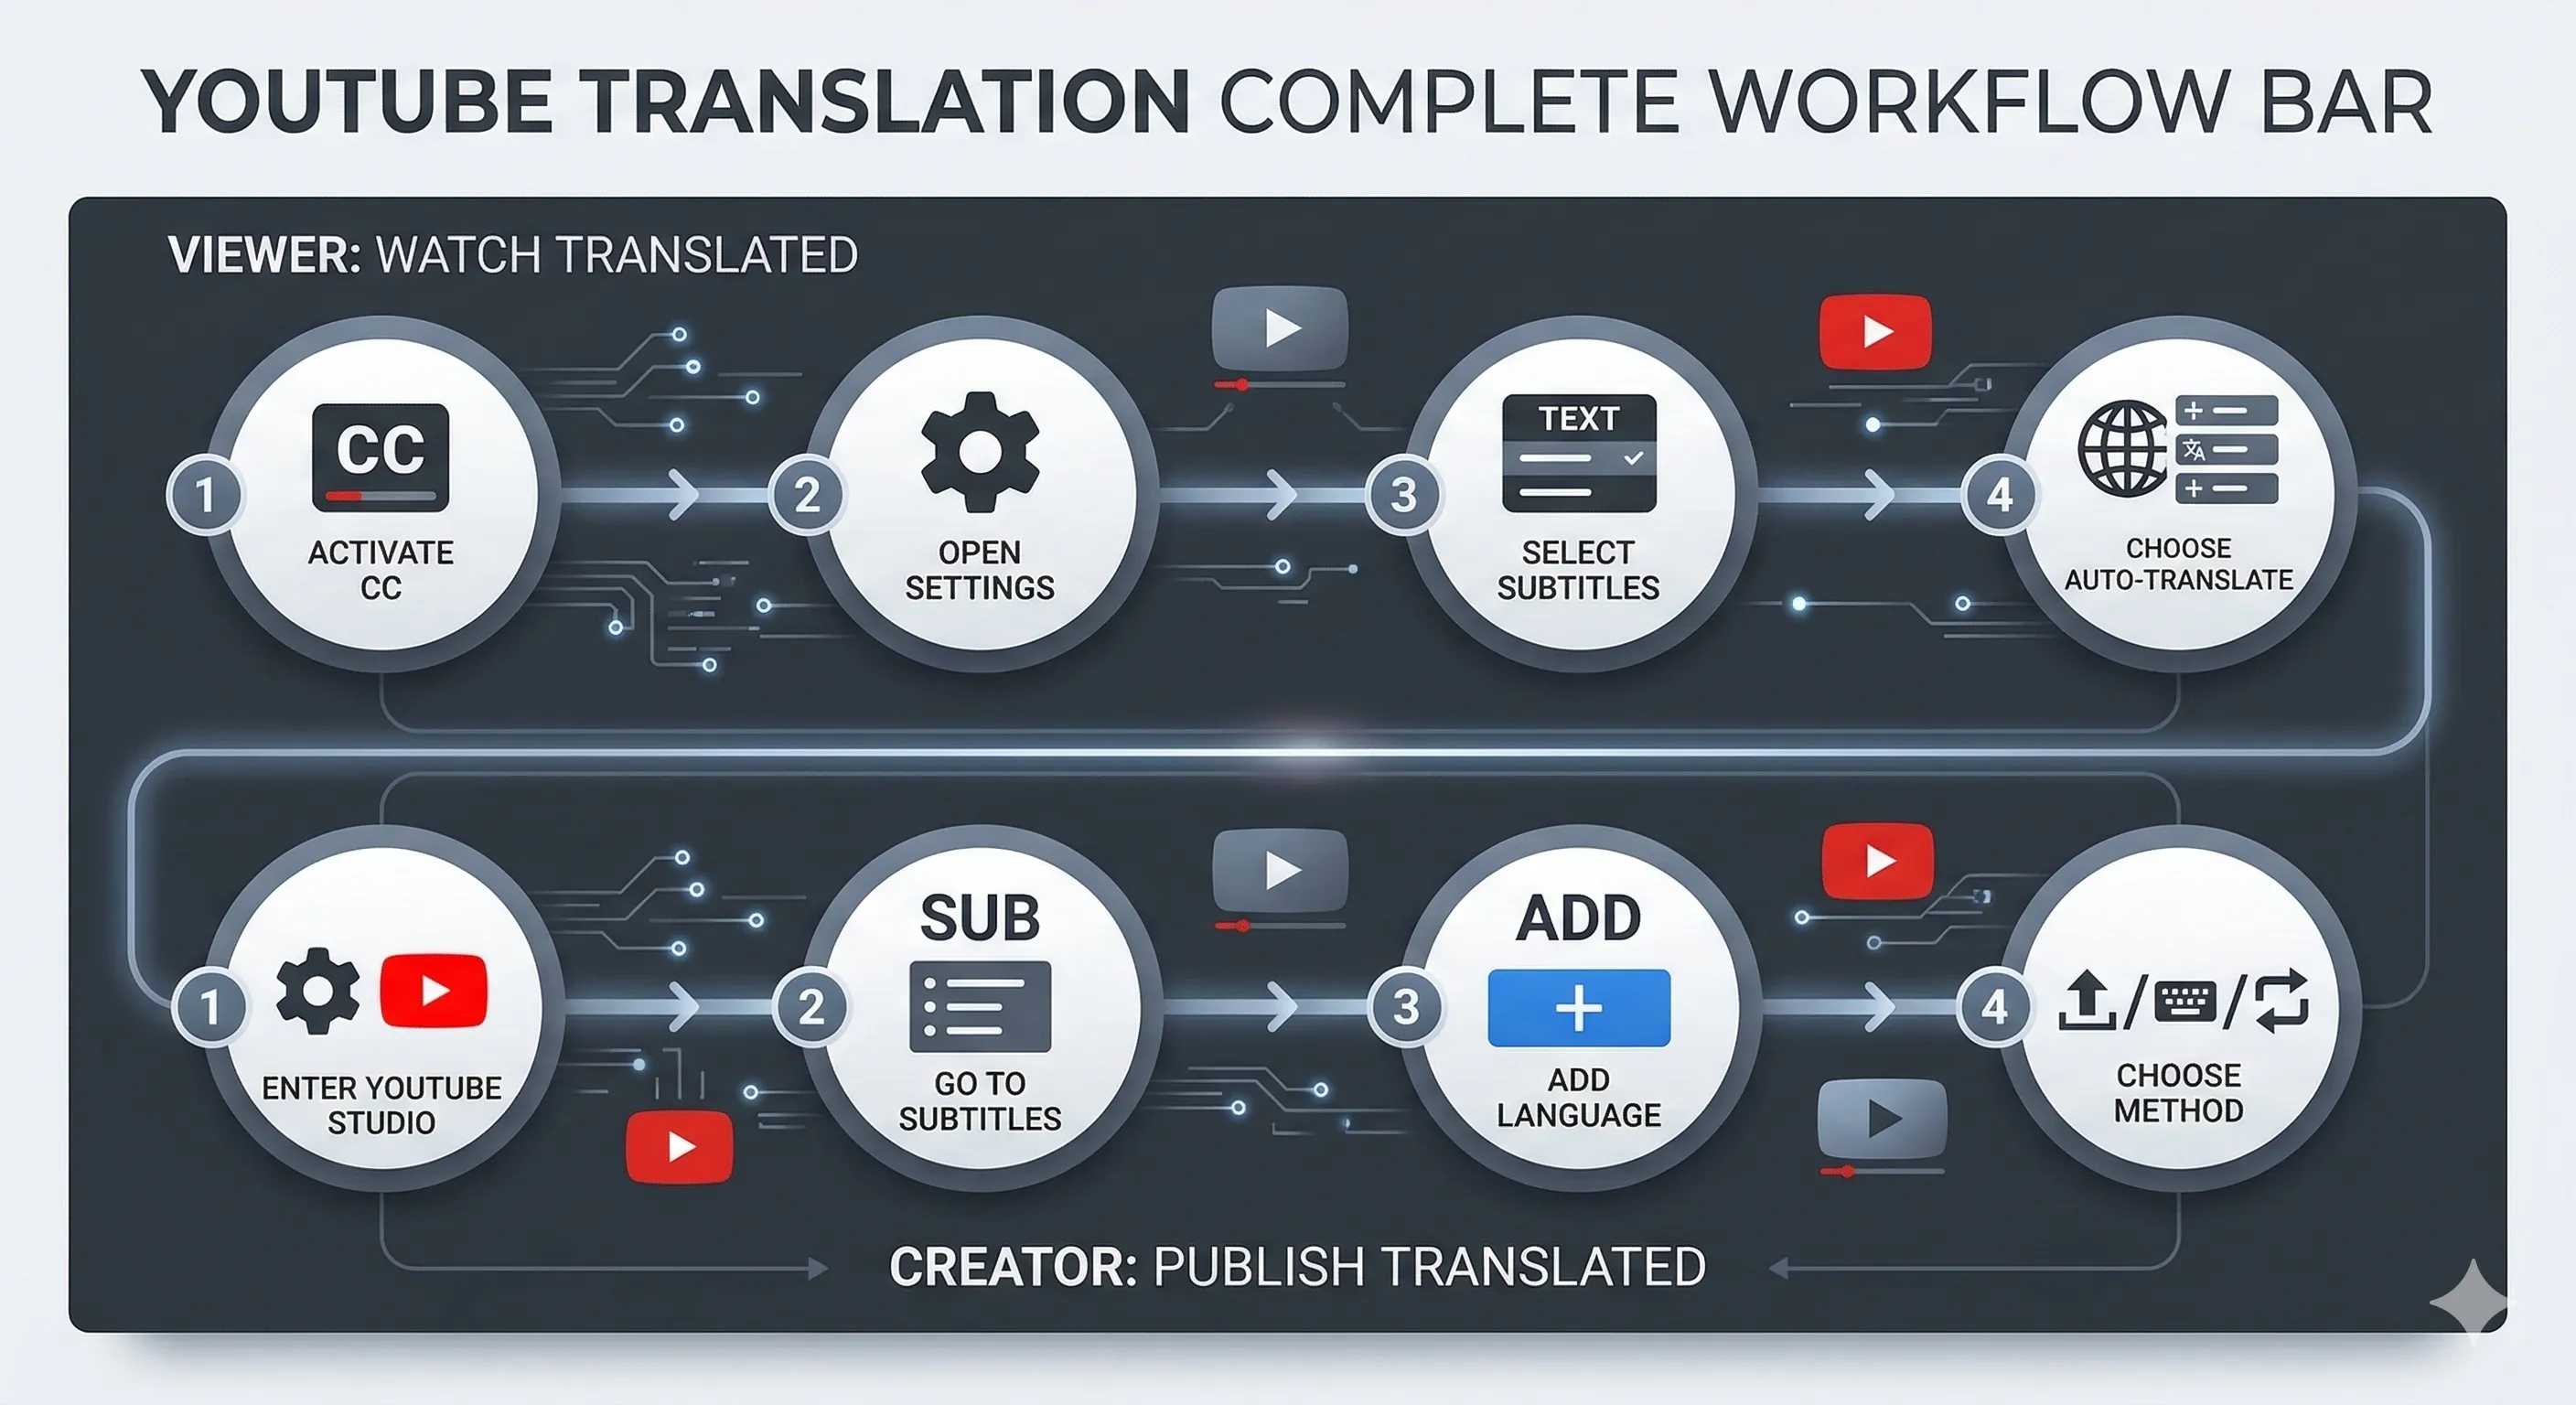
Every YouTube video that has captions enabled can be auto-translated by YouTube itself. Turn on the CC button, open the settings gear → Subtitles → Auto-translate → English. YouTube generates an English translation on the fly using Google's translation backend.
What works: conversational dialogue in major language pairs (Spanish, French, German, Japanese, Korean, Chinese all decode well). The pipeline is free, instant, and works on every video where the creator hasn't disabled captions.
What breaks: technical jargon (programming terms, medical vocabulary, niche hobbies), heavy accents, idioms, fast speech. The translations are word-level, so sentence structure can read as broken English. And on videos where the creator disabled captions entirely, this method doesn't apply at all.
Upgrade path: if YouTube's auto-translate misses too much, paste the video URL into /tools/video-transcription to get a more polished transcript — slower but much higher quality, especially on technical content.
Method 2: Full Dub with Voice Cloning (Paid, Shareable)
Best for: republishing the video in another language for an audience that won't read subtitles. Time investment: 5-15 minutes of processing per minute of video.
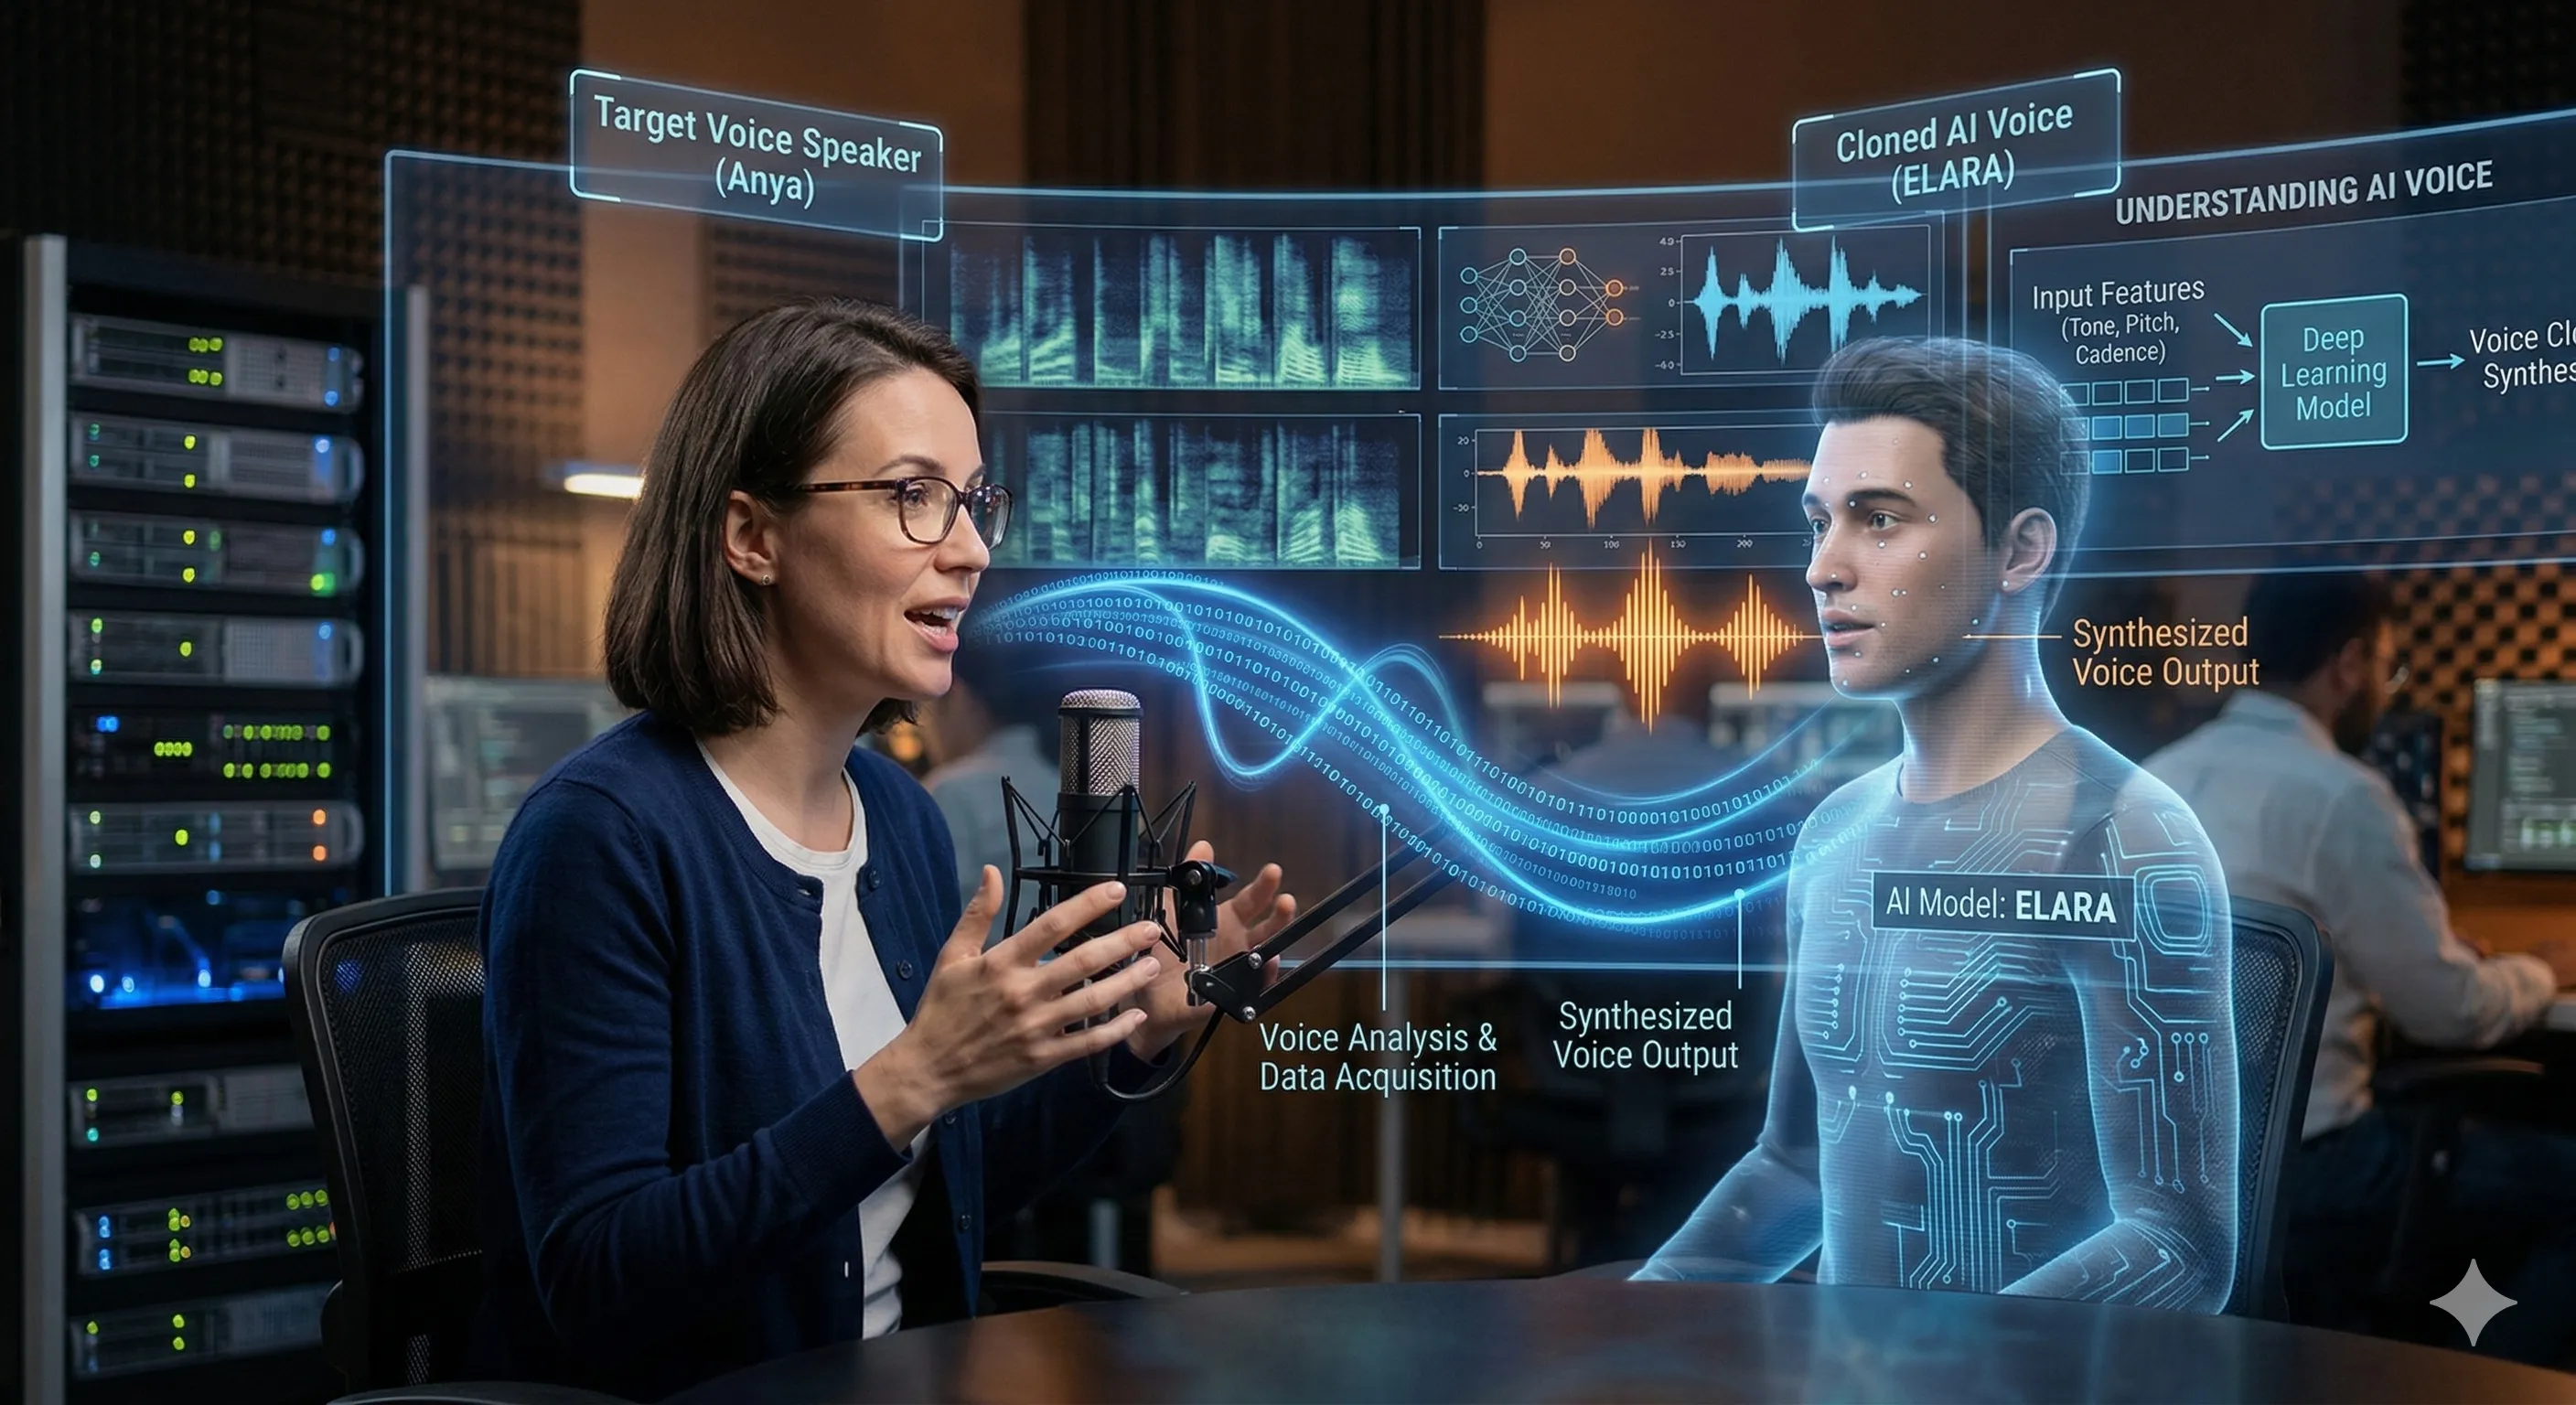
Full dubbing replaces the original audio with an English track in the original speaker's voice (cloned), then aligns mouth movements via lip-sync so it doesn't look overdubbed. The result is a watchable video that sounds like the speaker actually said the English version.
The workflow on Curify at /tools/video-dubbing: paste a YouTube URL or upload the video, pick the target language, and the pipeline runs five stages — separate the speech from background music, transcribe the audio, translate the transcript, clone the speaker's voice, and re-align lip movements. One upload produces three artifacts: the dubbed audio, the new video with aligned mouth movements, and a matching subtitle file.
What works: talking-head content shot front-on — interviews, course recordings, product demos, podcast video. The output is publish-ready for talking-head footage.
What breaks: profile angles (the lip-sync model is trained on front-facing speakers), heavy beards or hand-to-face occlusions (the model loses the mouth boundary), and long held-mouth pauses. For documentary-style B-roll with the speaker off-camera, plan to fall back to subtitle-only localization on those cuts.
Cost: pay-per-minute. A 10-minute talking-head video runs about the same total processing time as a manual dub would take in human hours, at a small fraction of the cost.
Method 3: Bilingual Subtitles (Free or Paid, Best for Learning)
Best for: language learners, ESL teachers, parents using video for kids' second-language exposure. Time investment: 2-5 minutes.
Bilingual subtitles show both languages stacked together — the original on one line, the English translation directly below. You hear the source language while reading both, which is how language acquisition actually works in practice.
The Curify workflow at /tools/bilingual-subtitles: paste a YouTube URL, pick the source and target languages, and the tool generates a .srt file with both languages aligned to the same timestamps. Burn it into the video for permanent display, or attach it as a switchable subtitle track.
Why this method matters: subtitle-only translation drops the source audio cues entirely. Bilingual subtitles preserve them. If your goal is to learn the language *while watching*, this is the only method that actually does that. Parents teaching kids a heritage language find this especially useful — the kid hears the original audio and sees both written forms side by side.
Free alternative: turn on the original-language CC on YouTube + use a browser extension like Language Reactor or Subadub to overlay a second-language translation. Less precise than a generated .srt, but free and works in the browser without any download.
How to Choose Between the Three Methods
Pick Method 1 (auto-subtitles) if you just want to watch a single video right now, in the next 30 seconds, and you don't mind that some lines may be slightly off.
Pick Method 2 (full dub) if you're republishing the video for an audience — your own YouTube channel, an internal training video for a global team, a course you're selling. Anywhere the viewer won't be reading subtitles.
Pick Method 3 (bilingual subtitles) if you're learning the source language, teaching it, or creating content for language learners.
You can also stack them: dub the main talking-head segments (Method 2), use bilingual subtitles for the educational sections (Method 3), and fall back to auto-translate for B-roll where the speaker is off-camera (Method 1). Curify's pipeline produces all three artifacts from one upload, so the same source video can serve all three audiences without re-uploading.
Step 5: Quality Check Before You Publish
Whichever method you pick, do these three checks before publishing or sharing:
1. Spot-check the translation on at least 3 random timestamps. Pick one near the start, one in the middle, one near the end. Read the translation while listening to the original. If it's noticeably off at any of the three, the whole transcript probably has the same issue — re-translate or accept the quality.
2. Listen to the dubbed audio (Method 2 only) for pacing. If English sentences run shorter or longer than the source, the lip-sync will drift in either direction. Most pipelines auto-pad or auto-compress to compensate, but the result can sound rushed or stretched. Re-render with a different pacing strategy if it's noticeable.
3. Check the lip-sync on profile shots (Method 2 only). This is where the model most often fails. If a key emotional moment is shot from the side, accept that the lip-sync will look slightly off there — or cut to a different angle for that line.
For casual use, Method 1 needs no quality check (it's good enough or it's not, and you'll know in 10 seconds). Methods 2 and 3 reward a 2-minute scan before publish.
Tools Comparison: What Each Method Needs
| Method | Tool | Cost | Time | Best For |
|---|---|---|---|---|
| Auto-subtitles | YouTube built-in CC + auto-translate | Free | 30 sec | Casual watching, single videos |
| Auto-subtitles (better) | Curify Video Transcription | Pay-per-minute | 2-5 min | When YouTube CC misses too much |
| Full dub | Curify Video Dubbing | Pay-per-minute | 5-15 min/min | Republishing for non-reading viewers |
| Full dub (alternative) | ElevenLabs Voice Studio | Subscription | Manual setup | When you need fine-grained voice control |
| Bilingual subtitles | Curify Bilingual Subtitles | Pay-per-minute | 2-5 min | Language learning, ESL teaching |
| Bilingual subtitles (free) | Language Reactor + YouTube CC | Free | Browser plugin | Learning while watching, no production |
The three Curify tools share one pipeline backbone — paste a YouTube URL once, pick the output format(s) you need, and the same upload produces the subtitle file, dubbed audio, or bilingual
.srt. Saves re-encoding and re-uploading for each format.How Curify Brings the Three Methods Together
Curify's /tools/video-dubbing and /tools/bilingual-subtitles run on a shared pipeline, so you can produce all three method outputs from a single YouTube URL upload:
1. The transcript (Method 1 upgrade path) — clean, time-aligned, ready to translate or hand to ChatGPT for a polish pass.
2. The dubbed video (Method 2) — translated audio in a cloned voice, lip-aligned, with a matching subtitle file produced at the same time.
3. The bilingual subtitle file (Method 3) — original + target language aligned to the same timestamps, ready to burn into the video or attach as a switchable track.
The tools share inputs but produce different outputs, so you can match the artifact to the audience without re-uploading the source. Pricing is per-minute of source video; no subscription, no monthly minimum.
If you want the engineer's view of how each pipeline stage works — audio source separation, neural translation, voice cloning, lip-sync alignment — see the production-grade architecture breakdown at /blog/video-transcription-technical-deep-dive. This guide is the user's view of the same pipeline.
Pick the Method, Skip the Pipeline
"How do I translate a YouTube video to English" is three different questions in one. Method 1 (auto-subtitles) handles casual watching. Method 2 (full dub) handles publishing. Method 3 (bilingual subtitles) handles learning. The tooling for all three has gotten dramatically better since 2024 — what used to require five separate scripts and a GPU is now a single URL paste in 2026.
The one warning to take seriously: every AI translation pipeline has edge cases. Heavy accents, technical jargon, rapid speech, profile-angle lip-sync — these are real failure modes, not theoretical ones. Spot-check the output before you commit to publishing. The 2-minute review is the difference between a great translated video and one that loses viewers in the first 30 seconds.
Take the next step
Putting what you read into practice.
Browse related topics
More templates and prompts in these areas.
Related Articles
Video Translation
AI YouTube Video Translation: Best Tools, Methods & Results 2026